
Table of Contents
RenderEffects #2: Pixel shaders in Android 13
In the previous article, I showed how to create a blur RenderEffect to easily blur everything in a View. This effect, while fun, is… not terribly useful on its own. We tend to want things to see things more clearly, not more blurry. It’s why we wear glasses. And why we are constantly cleaning smudges off of those glasses.
Like the last article, this content is based on (read: is a more verbose version of) parts of the Android Graphics video that I made with Sumir Kataria for the recent Android Developer Summit event. But don’t take my word for that; you can watch it here:
Blur is a useful effect to draw the user’s attention to other elements in a scene. This is a common technique in photography, where visual effects are used to help the viewer understand where to look. Photographers do this by focusing on specific subjects, while other elements in the foreground or background are blurry due to the depth of field. The harder edges of the focused subjects immediately draw our eyes, while unfocused elements literally fade into the background.
Similarly, in cartoon animation, there is a desire to draw attention to key subjects at specific times, to make sure the viewer follows important actions. Techniques for achieving this effect do not necessarily involve focus/blur, however, so I’ll set aside the topic of animation. I brought it up because it’s interesting that the same priority exists across all of these domains — directing the limited human attention span quickly to help impart salient information from any visual scene.
The reason I created the blur effect seen in the last article was because I wanted that blurred image container to be the background for the actual thing I wanted the viewer to focus on: a closeup of one of the pictures in the gallery. In my demo, when the user clicks on an image, a popup window appears with an enlarged view of that picture. The popup version is clear, while the background is blurry. This helps remove the otherwise noisy information in the background of all of those unrelated images, so the user can concentrate exclusively on the picture they selected.

But there’s more than just that background blur happening in this demo. In addition to the blurry background provided by RenderEffect, I wanted to use the new RuntimeShader effect enabled in Android 13+. You can see the result in the label of the image above. The label is translucent so you can see the bottom of the image it covers, but the label background is both frosted and (slightly) blurred, to allow the caption to be more legible. Both of these effects were achieved with an AGSL shader.
AGSL is a new feature in Android 13, which is accessed through the [also new] RuntimeShader API. I’ll go over what all of these are and how to use them. But first, let’s talk about fragment shaders.
First of all, I should point out that fragments are basically the same as pixels, except that fragments refer to the pieces of geometry that actually end up on the screen (and which are not clipped out or otherwise ignored). Pixels, on the other hand, are simply every pixel (“picture element”) on the screen. Fragment shaders were originally (and sometimes still are) called pixel shaders, but fragment shaders is the more current, and more correct terminology.
With that tedious bit of nomenclature out of the way… what are shaders?
Fragment shaders are small programs that run on every fragment of an image to calculate the color value that should appear there. Here’s a visualization of that; picture that bit of code running on every pixel of the view to produce the resulting nean sphere effect… because that’s exactly what’s happening.

You might be thinking at this point: Wait, a program is running on every single pixel? Isn’t that a lot of work? Well, yes. But that’s just how GPUs work; fragment shaders are the mechanism for calculating the color of the final pixels rendered by the GPU. We have been running fragment shaders for all rendering on Android for many years, ever since our first hardware-accelerated renderer came into being in Android 3.0 Honeycomb. The only difference with AGSL is that we now allow you to inject your own code into the shaders which are already being constructed by the renderer on your behalf.
Let’s look at an example:
uniform shader input;vec4 main(vec2 coords)
vec4 red = vec4(1, 0, 0, 1);
return mix(input.eval(coords), red, .5);
This shader has an input variable, which is the source that is being shaded. The shader also receives the coords for the current pixel, from which we can retrieve the current color value at that (x,y) location by calling eval(coords) on the input shader.
We create a variable red to hold an opaque red color, and then combine it with the current value via the mix() function, which does a linear interpolation between those colors. In this case, we are using half (.5) of each color to produce and return the final color value for the pixel. The result is something like this:

Okay, so that’s what shaders are. What is AGSL?
Android Graphics Shading Language (AGSL) is the language used to write shaders for Android. AGSL is essentially SkSL, which stands for Skia Shading Language, where Skia is the rendering engine for Android (among other client platforms, including Chrome). We renamed SkSL to AGSL to simplify the API essentially to avoid having to explain what Skia is in the middle of an Android API surface (which is exactly what I’m having to do here, but it’s a bit better in an article than it would be in the middle of API reference docs).
AGSL is nearly (but not completely) identical to GLSL ES1.0, where GLSL is the shading language of OpenGL ES. It is not exactly the same because SkSL has a slightly different usage of shaders than GLSL. In OpenGL, you pass in shaders that determine the final pixel color. But with AGSL, you are instead inserting a shader into the middle of the Skia rendering pipeline. Skia is already creating and using shaders that perform tasks such as clipping geometry and determining (and shading) anti-aliased boundaries of geometry. An AGSL shader is added to that set of shaders, which are all combined to produce the final pixel value drawn by the GPU.
Examples of SkSL shaders can be found at shaders.skia.org, where you can also play with and debug shader code online.

There is a question that might be forming in the back of your mind right about now: Doesn’t Android already have a Shader API? In fact, didn’t I already talk about it in the previous article on RenderEffects? Yes, and yes. And no.
Yes, Android has a Shader API: android.graphics.Shader. To quote from the reference documentation:
Shader is the base class for objects that return horizontal spans of colors during drawing.
In particular, Shader is the superclass for gradient effects such as LinearGradient, as well as BitmapShader. These objects, when set on a Paint object, apply those “Shaders” to the drawing operating, essentially sampling from the shaders to produce the colors used to render the object being drawn. For example, drawing a line with a Paint object that has a BitmapShader set on it will produce a line that is textured with colors from that bitmap.
And Yes, I talked about the existing Shader API in the previous article, specifically in terms of using RenderEffect to bundle up drawing attributes like Shaders that are applied to an overall View, instead of having to draw primitives manually with Paint objects inside a custom View. For example, you can create one of the gradient or bitmap shaders described above and then apply it to a view like this:
val effect = RenderEffect.createShaderEffect(shader)
myView.setEffect(effect)
But No, android.graphics.Shader is not the same as RuntimeShader. But they are related, both in API and in concept. In API terms, RuntimeShader is a subclass of that long-existing Shader class, because it is, after all, a shader. All of these shaders are essentially doing the same job; they are providing color values that are sampled when geometry is being drawn, telling the rendering engine the color value to use for each fragment that is generated. The difference between RuntimeShader and the existing shader classes is in terms of their programmability. All of the other Shader classes are essentially fixed-function shaders; they do a particular job, with a particular algorithm, and that’s all you get. You can have a LinearGradient with the parameters used to construct it. You can sample pixels from the bitmap supplied to BitmapShader. But you cannot supply custom algorithms to change how those pixels are sampled; you just get whatever we give you in the implementation of those Shader subclasses.
RuntimeShader, on the other hand, gives you full programmability. If you want to do a simple LinearGradient (as I’m about to show in the code below), you can do that. But you can also do something much more custom, complex, and dynamic, based on the input pixel colors, or your shader algorithm, or the limitations of your imagination. RuntimeShader brings to Android complete, dynamic programming logic at the per-pixel level.
Ok, so where were we? Oh right, I wanted to talk about how to get that blurred/frosted look for the image caption:

In my application, there are three main components in the view hierarchy, as seen here:
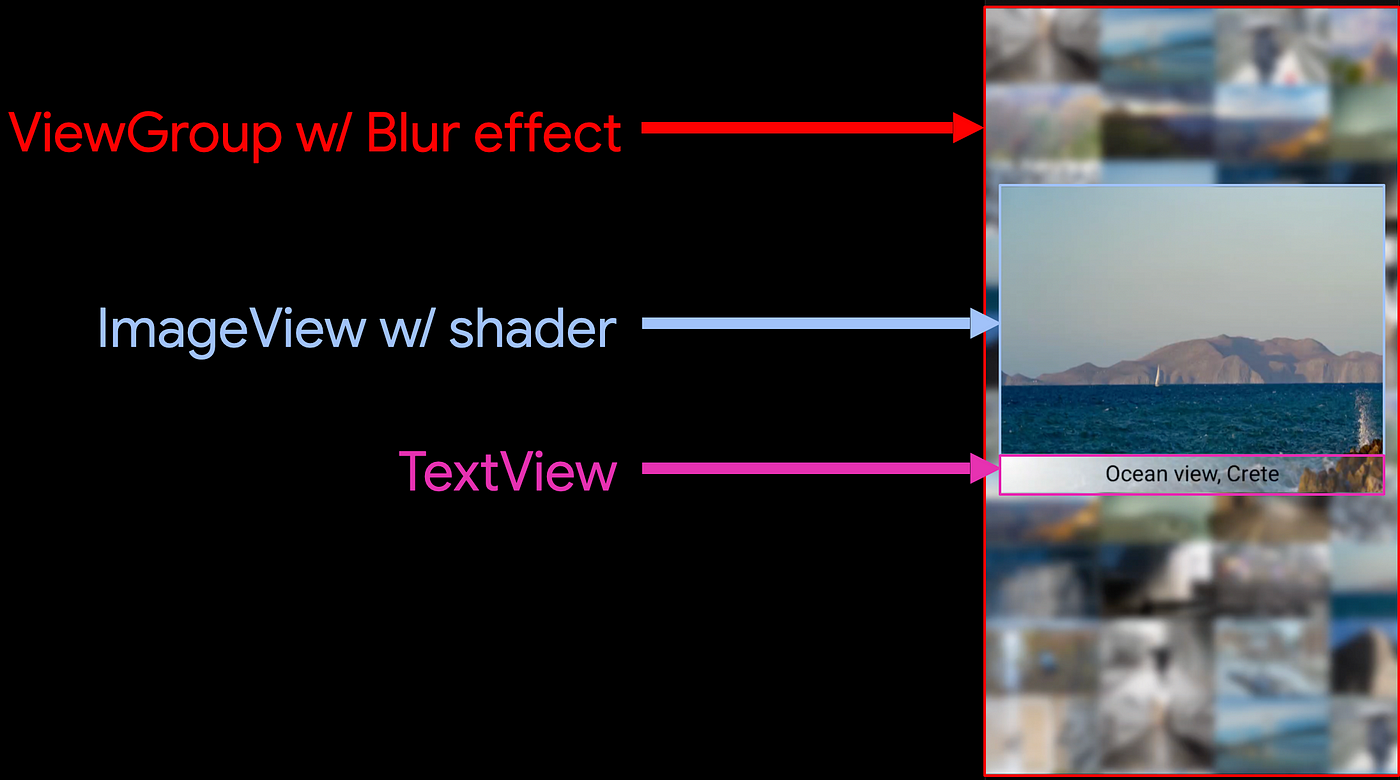
The background container is simply a holder for the image gallery, which is blurred by the RenderEffect we covered in the previous article. When someone clicks on an image, the program creates a PopupWindow with an ImageView, which holds a larger version of that image. This view is where the AGSL shader runs (though it limits its effect to only the caption area where the text appears). Finally, there is a TextView on top which draws the text onto a transparent background, so that the blurred/frosted effect of the ImageView shows under the text for that label area.
The AGSL shader is as follows. We pass in a string* to RuntimeShader, which is compiled and cached at runtime.
* Yes, a string. Shaders feel like a regression to the dark ages of programming, where you’d write code on punchcards and then send them to whoever managed the mainframe. At least we don’t have to wait for hours or days to find out there was a syntax error.
@RequiresApi(Build.VERSION_CODES.TIRAMISU)
val FROSTED_GLASS_SHADER = RuntimeShader("""
uniform shader inputShader;
uniform float height;
uniform float width;vec4 main(vec2 coords)
vec4 currValue = inputShader.eval(coords);
float top = height - 100;
if (coords.y < top)
return currValue;
else
// Avoid blurring edges
if (coords.x > 1 && coords.y > 1 &&
coords.x < (width - 1) &&
coords.y < (height - 1))
// simple box blur - average 5x5 grid around pixel
vec4 boxSum =
inputShader.eval(coords + vec2(-2, -2)) +
// ...
currValue +
// ...
inputShader.eval(coords + vec2(2, 2));
currValue = boxSum / 25;const vec4 white = vec4(1);
// top-left corner of label area
vec2 lefttop = vec2(0, top);
float lightenFactor = min(1.0, .6 *
length(coords - lefttop) /
(0.85 * length(vec2(width, 100))));
// White in upper-left, blended increasingly
// toward lower-right
return mix(currValue, white, 1 - lightenFactor);
""")
(Note: this white frosted-glass effect is based partially on a more involved example at pushing-pixels.org).
There are three input variables (or “uniforms”). The width/height variables are passed in to tell the shader how large the area is; this allows calculation of the caption area at the bottom. The inputShader variable holds the original pixel colors that are being shaded.
The first step is trivial-rejection: if the pixel at this location is outside of the caption area, the shader simply returns the original pixel value (calculated by calling eval(coords) and stored in currValue).
If the pixel at coords is on the caption border, we avoid blurring it because blurring border pixels can run into problems by using colors outside of the source image in the blurring calculation. So we return the original pixel value in this case.
If the pixel is inside the caption area, then we blur it using a simple box blur algorithm (mostly commented-out above for brevity), which just averages all of the pixels around the one we are working on. You can do this with any radius; here I am using a 5×5 grid as a tradeoff between blurring enough to make it visually obvious without taking too much time/performance to do it (the more pixels you include, the longer this operation takes).
Finally, we “frost” the label area on top of the blur by using a linear gradient going from opaque white at the upper left to mostly-translucent at the lower right. This allows the blurred underlying image to show up increasingly toward the right of the label.
The end result is shown below. Note that the rocks and ocean under the label area are blurrier inside the label area than outside. Meanwhile, the frosted-glass effect helps create enough of a contrasting visual area for the black text to show up clearly, while still showing the underlying image.

Once you have your RuntimeShader, setting it on a view is similar to what we saw with the blur effect; you create a RenderEffect and set that effect on the view. For the FROSTED_GLASS_SHADER defined above, we create the RenderEffect like this:
val effect = RenderEffect.createRuntimeShaderEffect(
FROSTED_GLASS_SHADER, "inputShader")
The parameter "inputShader” tells the system the name of the uniform to use when passing in the original pixel values.
We need to also set the other uniforms used in the shader so that it knows the size of the destination, and thus bounds of the caption area:
FROSTED_GLASS_SHADER.setFloatUniform("height", h.toFloat())
FROSTED_GLASS_SHADER.setFloatUniform("width", w.toFloat())
Now that we have created and configured our RuntimeShader, we set it on the ImageView with setEffect():
setRenderEffect(effect)
And that’s it! Now when the View is drawn, the system will automatically call the shader code for every pixel, producing the results seen above.
There are a couple of details in the implementation above that are worth noting.
Bugs, bugs bugs
For one thing, there is a bug in the current releases which I discovered in getting my app to work: the View does not pick up any changes to uniform values without setting a new RenderEffect. That is, it should be possible to create a shader and then change (or even animate) uniform values without updating the actual shader. And it can do that… but the RenderEffect does not get those changes. The workaround is to call both createRuntimeShaderEffect() and setEffect() for those changes to take, er, effect.
Shader vs LinearGradient
The observant reader who is familiar with Android’s existing graphics APIs may have gleaned that I didn’t actually need an AGSL shader to get the visual effect above. I could (and should) have used a second blur RenderEffect to blur the desired area and then a simple LinearGradient to go from opaque to translucent white, which would give the same frosted-glass look that I achieved with… more code and effort (and probably more processing time). I’d recommend that other, simpler approach in general; don’t just use shaders because they’re neat (at least not in real apps).
But I wanted a very simple effect to describe to make it easy to understand what shaders are, how they work, and what you can do, especially in the context of more typical UI use cases, rather than the more exotic examples you can see on shader sites. So don’t just copy the shader code above, but do experiment with AGSL and shaders in general to figure out what works for your use cases.
A Faster Way to Blur
There are two problems with the box blur I used in FROSTED_GLASS_SHADER. One is that it is not as good as the RenderEffectblur seen in the image gallery behind it (covered in previous article); it doesn’t take into account enough of the surrounding pixels to get a really blurry result. The other problem is that it takes too much time. I haven’t benchmarked these approaches, but in general, the RenderEffect blur is going to be faster (it’s highly optimized and uses some techniques I can’t easily do in the shader), and better than doing a simple box blur manually.
Unfortunately, it is not obvious how to use a RenderEffect blur. I need to blur the View where the image lives, but I only want to blur a portion of it (the caption area). Attaching a RenderEffect to a View affects the entire View, and blurring the entire popped-up image is not what we want.
Fortunately, there is a way to make it work. But you will have to read the next article in this series to find out. (Another teaser! When will this incessant torment end?!?!?!)
Here are some sites and docs where you can learn more about some of the things discussed above:
Skia shaders
AGSL
GLSL
Look for the third article in the series soon. I’ll update the link here when it’s available.
