
Table of Contents
Understanding user behavior is critical to the success of any online business, and Google Analytics 4 (GA4) provides marketers with a powerful tool to gain actionable insights. One of the most important features of GA4 is event tracking, which allows marketers to gather detailed information on user engagement and make data-driven decisions for marketing strategies. In contrast to Universal Analytics, which uses traditional tracking methods, GA4 event tracking relies on a more flexible and customizable approach that allows for greater data accuracy and customization.
![]()
How event tracking works in GA4.
In this article, we will delve into the specifics of GA4 event tracking and explain how it can help your business improve your marketing strategies. I’ll also provide a step-by-step guide on how to implement custom events in GA4 using Google Tag Manager. By the end of this article, you will have a better understanding of how GA4 event tracking can benefit businesses and how to implement it effectively using Google Tag Manager.
What is Google Analytics 4 and how does it differ from Universal Analytics?
Google Analytics 4 (GA4) is the latest iteration of Google’s web analytics service, and it differs from its predecessor, Universal Analytics (UA), in several ways.
First, GA4 is designed to provide better cross-device and cross-platform tracking, allowing marketers to track and analyze user behavior across multiple devices and platforms, including mobile apps, websites, and offline interactions. In contrast, UA provides a more limited view of user interactions, focusing primarily on website sessions.
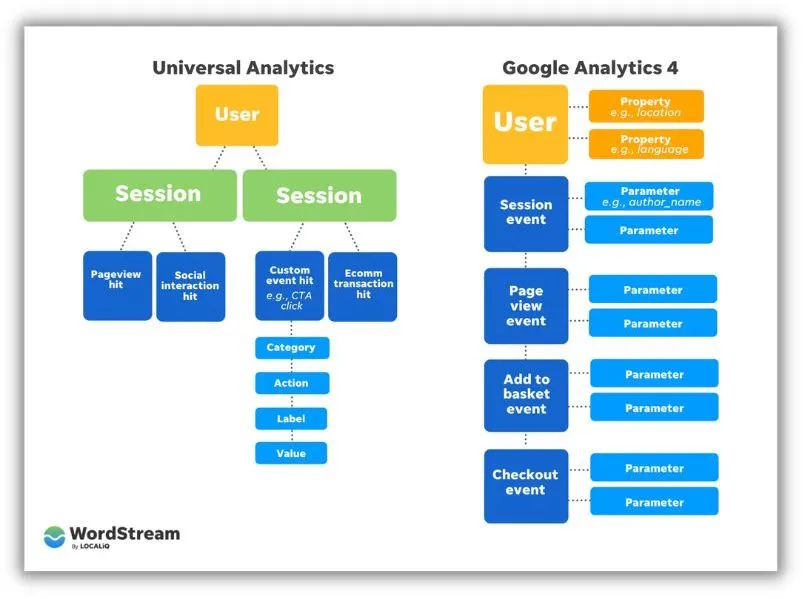
Another significant difference between GA4 vs. UA is their approach to data modeling. GA4 introduces a new event-based data model, which tracks user interactions as individual events, such as button clicks, video views, or form submissions, rather than grouping them into sessions.
Finally, GA4 provides more advanced machine learning capabilities, enabling marketers to gain deeper insights into user behavior and optimize their marketing strategies. For example, GA4’s “predictive metrics” feature uses machine learning to forecast user behavior and predict future outcomes.
What is event tracking in GA4 and why is it important for marketers?
Event tracking is a crucial aspect of Google Analytics 4 that helps marketers gather detailed insights into user interactions with their digital properties.
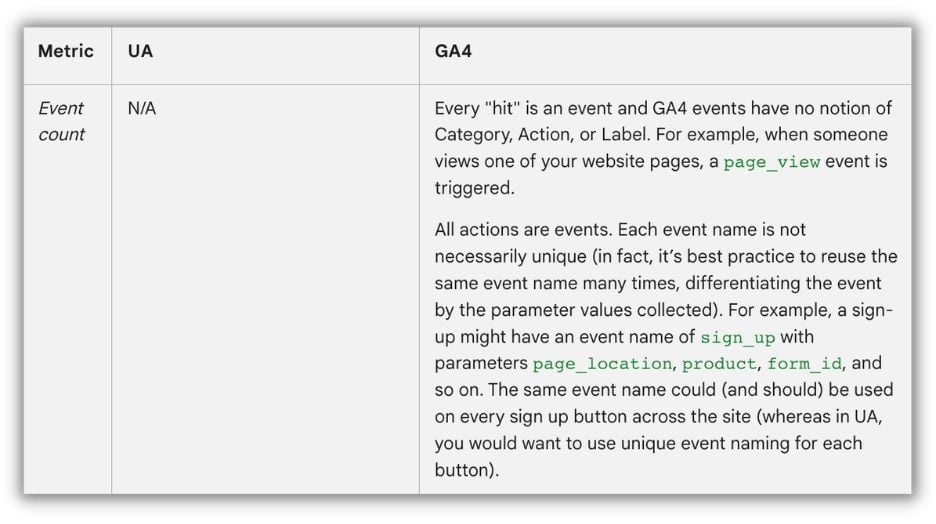
In GA4, events refer to specific user actions, such as button clicks, video views, and form submissions, that marketers want to track and analyze.
Event tracking enables marketers to measure user behavior beyond pageviews and sessions, providing a more accurate and granular understanding of user engagement.
Event tracking is essential for marketers because it allows them to make data-driven decisions when developing and optimizing marketing strategies. By tracking user interactions with their website or app, marketers can identify the most engaging content and optimize the user experience to drive better engagement and conversions.
With GA4’s cross-device and cross-platform tracking capabilities, event tracking enables marketers to gain a more comprehensive view of their users’ journeys across different devices and platforms, leading to more effective marketing strategies.
What are events and how are they tracked in GA4?
Events in GA4 refer to user interactions with content on a website or app that can be measured and analyzed. They provide insight into how users engage with a website or app, such as the actions they take, pages they visit, and features they use. Tracking events in GA4 helps businesses and marketers understand user behavior, optimize user experience, and make informed decisions to improve marketing strategies.
In GA4, events are tracked using the Google Analytics 4 data model, which is based on an event-driven approach. The data model focuses on capturing user interactions as events, which are then sent to Google Analytics for processing and reporting. Events in GA4 can be categorized into three types:
- Automatically collected events: These are events that GA4 automatically tracks without any additional implementation, such as first_open, session_start, and page_view. They provide basic insights into user engagement and behavior.
- Enhanced measurement events: GA4 offers an Enhanced Measurement feature that automatically tracks additional user interactions like scroll, click, and video engagement. This can be enabled or customized within the GA4 interface.
- Custom events: These are events that you define and implement manually, based on specific user interactions that are relevant to your website or app. Custom events provide deeper insights into user behavior and engagement, tailored to your business needs.

How to use Google Tag Manager + Google Analytics 4 for better tracking
You can set up Google Tag Manager for GA4 to better track and understand events data. We’ll walk through some specific steps.
A brief introduction to Google Tag Manager
Google Tag Manager (GTM) is a free, user-friendly tool that allows you to manage and deploy various tracking codes and marketing tags on your website or app without the need for extensive coding knowledge. GTM simplifies the process of implementing tracking tags, such as Google Analytics, Google Ads, Facebook Pixel, and other third-party tags, by centralizing their management in one interface.
Using GTM has several benefits, including:
- Ease of use. You can add, edit, or remove tags without needing to modify the website or app code directly, making it accessible to marketers and non-developers.
- Faster deployment. GTM streamlines the tag implementation process, allowing you to quickly deploy and update tags without relying on developers.
- Version control. GTM maintains a version history of your tag configurations, allowing you to roll back changes in case of errors or issues.
- Improved site performance. GTM uses asynchronous loading to minimize the impact of tags on your website’s performance and load times.
- Built-in triggers and variables. GTM provides a variety of built-in triggers and variables that enable you to control when and how your tags are fired, improving the accuracy and relevance of your tracking data.
I talk through Google Tag Manager in more detail in this YouTube video.
Setting up Google Tag Manager for GA4
Setting up Google Tag Manager (GTM) for Google Analytics 4 (GA4) involves creating a GA4 tag within your GTM container and configuring it to send data to your GA4 property.
Here’s a step-by-step guide to help you set up GTM for GA4:
- Create a GA4 property: If you haven’t already, set up a new GA4 property in your Google Analytics account. Note the Measurement ID (e.g., G-XXXXXXXXXX) assigned to your GA4 property, as you’ll need it in later steps.
- Sign in to Google Tag Manager: Log in to your GTM account and select the appropriate container for your website or app.
- Create a new GA4 tag:
- Click “Tags” in the left sidebar.
- Click “New” to create a new tag.
- In the “Tag Configuration” box, click on “Tag Type” and select “Google Analytics: GA4 Configuration.”
- Enter your GA4 Measurement ID from Step 1 in the “Measurement ID” field.
- Click “Save” to save your tag configuration.
- Set up a trigger for the GA4 tag:
- In the “Triggering” box, click on the pencil icon to add a trigger.
- Choose the “All Pages” trigger for websites or the “App – All Screens” trigger for apps. This ensures that the GA4 tag fires on every page or screen, allowing you to track basic interactions like page views.
- Click “Save” to associate the trigger with your GA4 tag.
- Test your GA4 tag: Before publishing your changes, click “Preview” in the GTM interface to test your GA4 tag. Visit your website or app and verify that the tag is firing correctly using GTM’s
Preview mode or the GA4 DebugView in Google Analytics. - Publish your GTM container: Once you’ve confirmed that the GA4 tag is working as expected, click “Submit” in the GTM interface to publish your changes. Your GA4 tag is now live, and data will begin flowing to your GA4 property.
![]()
After setting up GTM for GA4, you can use GTM to manage other GA4 events, such as custom events or enhanced measurement events, by creating additional GA4 tags and configuring them with the appropriate triggers and variables.
How to create a custom event in GA4 via Google Tag Manager
A client of mine wanted to track how many times a user clicked on the “Buy Now Pay Later” button on his website. To achieve this in Google Analytics 4 (GA4), we need to set up a custom event using Google Tag Manager. Here’s a step-by-step guide to setting up a custom button click event for the “Buy Now Pay Later” button:
- Identify the button: First, inspect the HTML source code of the website and find the “Buy Now Pay Later” button.
- Create a trigger for the button click (using click text):
- In your Google Tag Manager container, click “Triggers” in the left sidebar.
- Click “New” to create a new trigger.
- Name your trigger (e.g., “Buy Now Pay Later Click”).
- In the “Trigger Configuration” box, click on “Trigger Type” and select “Click – All Elements.”
- Choose “Some Clicks” under “This trigger fires on.”
- In the dropdown menus, select “Click Text” and enter the click text “Buy Now Pay Later” to identify the button.
- Click “Save” to save your trigger.
- Create a new GA4 Event tag:
- Click “Tags” in the left sidebar.
- Click “New” to create a new tag.
- Name your tag (e.g., “GA4 – Buy Now Pay Later Click”).
- In the “Tag Configuration” box, click on “Tag Type” and select “Google Analytics: GA4 Event.”
- Enter your GA4 Measurement ID (e.g., G-XXXXXXXXXX) in the “Measurement ID” field.
- In the “Event Name” field, enter a descriptive name for your custom event (e.g., “buy_now_pay_later_click”).
- Click “Add Row” under “Event Parameters” to define additional parameters for your event. Enter “button_name” in the “Parameter Name” field and “Buy Now Pay Later” in the “Parameter Value” field.
- Click “Save” to save your tag configuration.
- Set up the trigger for the GA4 Event tag:
- In the “Triggering” box, click on the pencil icon to add a trigger.
- Choose the “Buy Now Pay Later Click” trigger you created in Step 2.
- Click “Save” to associate the trigger with your GA4 Event tag.
- Test your custom button event:
- Click “Preview” in the GTM interface to test your GA4 Event tag and custom trigger.

- Visit your website and click the “Buy Now Pay Later” button.
- In GTM’s Preview mode or GA4’s DebugView, verify that your custom event fires correctly when the button is clicked.
- Click “Preview” in the GTM interface to test your GA4 Event tag and custom trigger.
- Publish your GTM container:
- Once you’ve confirmed that the custom event is working as expected, click “Submit” in the GTM interface to publish your changes.
- Your custom button event is now live, and data will be sent to your GA4 property when users click the “Buy Now Pay Later” button.
By using the click text as the unique attribute in the trigger configuration, Google Tag Manager will fire the custom event when a user clicks a button or element with the text “Buy Now Pay Later” on the website.
How to set up the Buy Now Pay Later Event in GA4
To set up the “Buy Now Pay Later” event in GA4 using Google Tag Manager and mark it as a conversion, follow these steps:
- Click on “Configure” (gear icon) in the left-hand menu to access the property settings.
- Click Events.
- Click “Create event.”
- For the purpose of this demo, we’ll create an event that looks like the following:

- Mark as conversions: Ensure the event is successfully sending data to your GA4 property (You can use the real time view in GA4 for this).
- Navigate to your GA4 property: Log in to your Google Analytics account and access the GA4 property where you have set up the “Buy Now Pay Later” button click event.
- Define the event:
- Click on the “Configure” (gear icon) in the left-hand menu to access the property settings.
- Click on Conversions and add the name that you called your new event in the steps above.
- After some time, the conversion looks like this (make sure “Mark as conversion” is checked):

I go through all of this in detail in the video tutorial below.
Start tracking your events in Google Analytics 4
To wrap up, event tracking in Google Analytics 4 is an essential tool for marketers to understand user behavior and optimize their digital properties for better engagement and conversions.
GA4’s event-based data model provides a more flexible and customizable approach to tracking user interactions, enabling businesses to gain deeper insights into user behavior and develop more effective marketing strategies.
By using Google Tag Manager, businesses can implement custom events in GA4 with ease, providing tailored insights into specific user interactions. By following the step-by-step guide provided, businesses can set up and mark custom events as conversions in GA4, allowing for even more detailed analysis of user behavior and marketing performance.
Overall, GA4’s event tracking feature is a powerful tool that should not be overlooked by any online business looking to improve its marketing strategies and overall performance.
