
For the last few years, [Mangy_Dog] has been working on what is easily the most technically and aesthetically impressive Star Trek tricorder prop the world has ever seen. With each new version of the hardware we’ve gotten the occasional peek under the hood or source code walk-through, but these limited presentations have made it somewhat difficult to really appreciate the scale of this undertaking.
But now thanks to this epic hour-long tour of the hardware and software that makes up version 2.5 of his Voyager tricorder, we can finally see just how incredible the engineering that’s gone into this project really is. Every detail has been meticulously considered to deliver a final product that’s not only as visually accurate as possible, but reliable enough to actually carry around.
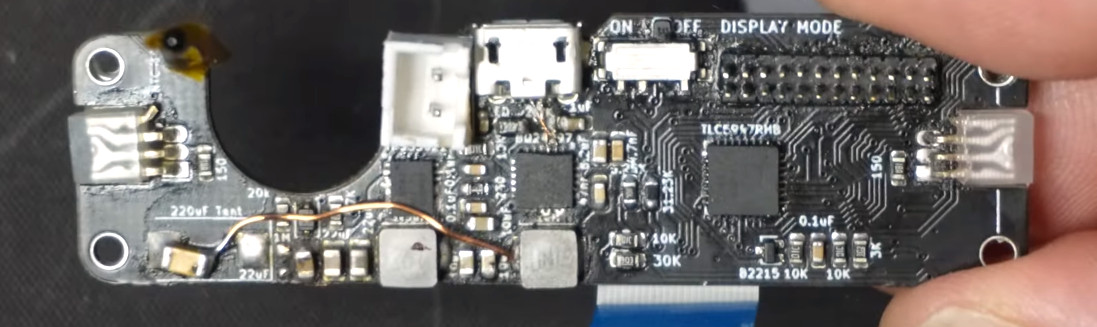
 In the video, [Mangy_Dog] demonstrates how the new version of the tricorder can be dissembled with just a few common tools, which he felt was an important goal for the project so that it could be repaired and potentially even upgraded over time. Not that there’s much breathing room inside the enclosure for new goodies — the density of the internal electronics is astounding, perhaps the highest we’ve ever seen in a homebrew project like this.
There’s seven separate PCBs in the top half of the tricorder alone, with the most important ones being (relatively) easy to remove should they require service. More electronics are hiding in the lower half of the device, but unfortunately those needed to be permanently sealed up in the case so as not to ruin the futuristic Trek aesthetic with unsightly screws or access hatches.
What we found particularly interesting was hearing about all the little bodges and fixes that he’s had to implement. Even after several hardware revisions, with the dizzying array of components packed into this build, the occasional goof is simply inevitable. [Mangy_Dog] points each one out, explains what the cause was, and shows how he implemented the repair. It’s an important reminder that, even in the most fantastically engineered projects, there’s always room to improve and sharpen your skills.
While three-quarters or so of the video’s total runtime is dedicated to going over the hardware, he does dedicate a bit towards the end towards the software that pulls it all together. Though he only goes through a few subroutines and functions, it’s clear that [Mangy_Dog] is just as adept with with the keyboard as he is with the soldering iron.
To close out the video he goes over some of the other projects hes working on, and knowing the level of detail and professionalism he brings to all of his creations, we can’t wait to see what he’s got in store for us next.
